
Qualities that Define the Best Residential Demolition Contractors


The process of demolition demands precision, expertise, and an unwavering commitment to safety and efficiency. Among the myriad facets of construction, house demolition stands as a specialized discipline requiring a unique set of skills and attributes. At the cornerstone of this trade lie the qualities that epitomize the best house demolition contractors.
Foremost among these qualities is a profound commitment to safety. The finest demolition contractors prioritize safety measures above all else. They meticulously plan each step of the demolition process, conducting comprehensive site evaluations and risk assessments to identify potential hazards. By adhering to stringent safety protocols and leveraging cutting-edge technology and equipment, they ensure that both their crew and the surrounding environment remain unscathed.
Here are several vital qualities and aspects that define a reputable and effective contractor in this field:
Experience and Expertise: A top-notch demolition contractor typically has extensive field experience. They understand the intricacies of different types of structures, materials, and the safest methods for demolition. Their expertise allows them to assess each project’s unique requirements, whether it involves a small residential house or a larger commercial building.
Safety Protocols and Compliance: Safety is paramount in demolition work. Reliable contractors from reputable home demo companies strictly adhere to safety regulations and industry standards. They maintain a comprehensive understanding of safety protocols, ensuring the well-being of their crew, bystanders, and the property itself. This includes securing necessary permits and conducting thorough site inspections to identify potential hazards.
Skilled Workforce and Equipment: A proficient demolition contractor employs a skilled team equipped with the necessary knowledge and tools. They have access to state-of-the-art machinery, protective gear, and demolition equipment required to carry out the job efficiently and safely. Combining skilled labor and cutting-edge technology enables them to handle diverse demolition challenges effectively.
Environmental Awareness and Sustainability: Responsible demolition contractors prioritize environmentally friendly practices. They may salvage reusable materials, recycle debris, or employ methods that minimize environmental impact. Such initiatives demonstrate a commitment to sustainability, aligning with modern societal values and regulatory requirements.
Effective Project Management: Demolition projects involve intricate planning and execution. A reputable contractor demonstrates excellent project management skills, effectively organizing tasks, timelines, and resources. They maintain open communication channels, informing clients about progress, unexpected hurdles, and any necessary adjustments to the initial plan.
Attention to Detail and Precision: Demolition isn’t just about tearing down a structure; it requires precision. A skilled contractor pays attention to details such as structural weaknesses, adjacent properties, and utilities, ensuring the demolition process is controlled and targeted.
Clear Communication and Professionalism: Strong communication skills are essential in any contracting business. A reliable demolition contractor listens to clients’ needs attentively, provides clear explanations of the process, and addresses any concerns promptly. Professionalism in their interactions fosters trust and confidence in their ability to handle the project competently.
Reputation and Reviews: A contractor’s reputation in the industry speaks volumes. Positive reviews, testimonials, and a portfolio showcasing successful projects demonstrate their credibility and reliability. Word-of-mouth referrals often highlight a contractor’s commitment to quality workmanship …
Guarding Elegance: Preventive Floor Care Essentials


Guarding Elegance: The Essence of Preventive Floor Care
Maintaining the beauty and longevity of your floors requires a proactive approach to preventive floor care. Explore essential tips and strategies to safeguard your floors from wear and tear, ensuring they remain a timeless element of your home.
Understanding Preventive Floor Care: A Proactive Mindset
Preventive floor care involves adopting a proactive mindset to protect your floors before damage occurs. By implementing a combination of daily habits, strategic placement of protective elements, and timely interventions, you can guard the elegance of your floors and extend their lifespan.
Daily Habits for Floor Preservation: Small Actions, Big Impact
Small, consistent actions make a significant impact on floor preservation. Start with daily habits such as sweeping or vacuuming to remove dirt and debris promptly. This prevents scratches and abrasions that can result from particles being dragged across the floor surface.
Area Rugs and Floor Mats: Protective Shields
Strategically placing area rugs and floor mats serves as a protective shield for high-traffic areas. These rugs not only enhance the aesthetic appeal of your space but also act as barriers against potential scratches, stains, and wear. Choose rugs with non-slip backings to ensure stability and safety.
Furniture Pads: Safeguarding Against Scratches
The movement of furniture can cause scratches and scuffs on your floors over time. Safeguard against these issues by attaching felt or rubber pads to the bottom of furniture legs. This simple addition prevents direct contact between the furniture and the floor, preserving the pristine surface.
Regular Floor Inspections: Identifying Early Signs of Wear
Regular inspections are crucial for identifying early signs of wear and addressing them promptly. Look for scratches, dents, or worn areas. By catching these issues early, you can take preventive measures to mitigate further damage and extend the life of your floors.
Controlled Humidity Levels: Minimizing Contraction and Expansion
Wooden floors, in particular, are sensitive to changes in humidity, which can lead to contraction and expansion. Maintain controlled humidity levels within your home to minimize these fluctuations. Use humidifiers in dry seasons and dehumidifiers in humid climates to create a stable environment for your floors.
Avoiding Water Exposure: Shielding Against Damage
Water exposure is a common culprit for floor damage, especially for hardwood and laminate floors. Wipe up spills immediately to prevent water from seeping into the flooring material. Place waterproof mats in areas prone to spills, such as kitchens and bathrooms, to provide an additional layer of protection.
Gentle Cleaning Products: Preserving Floor Finishes
Choosing gentle cleaning products is essential for preserving floor finishes. Harsh chemicals can strip away protective layers and damage the appearance of your floors. Opt for pH-neutral, floor-specific cleaners to effectively clean without compromising the integrity of the finish.
Entrance Mats: Trapping Dirt at the Door
Preventive floor care begins at the entrance. Place durable entrance mats at doorways to trap dirt and debris before they reach your floors. This simple practice not only keeps your floors cleaner but also minimizes the need for more intensive cleaning
Seaside Dreams: Coastal Kids’ Decor Delights

Transforming Spaces: Coastal Kids’ Decor Delights
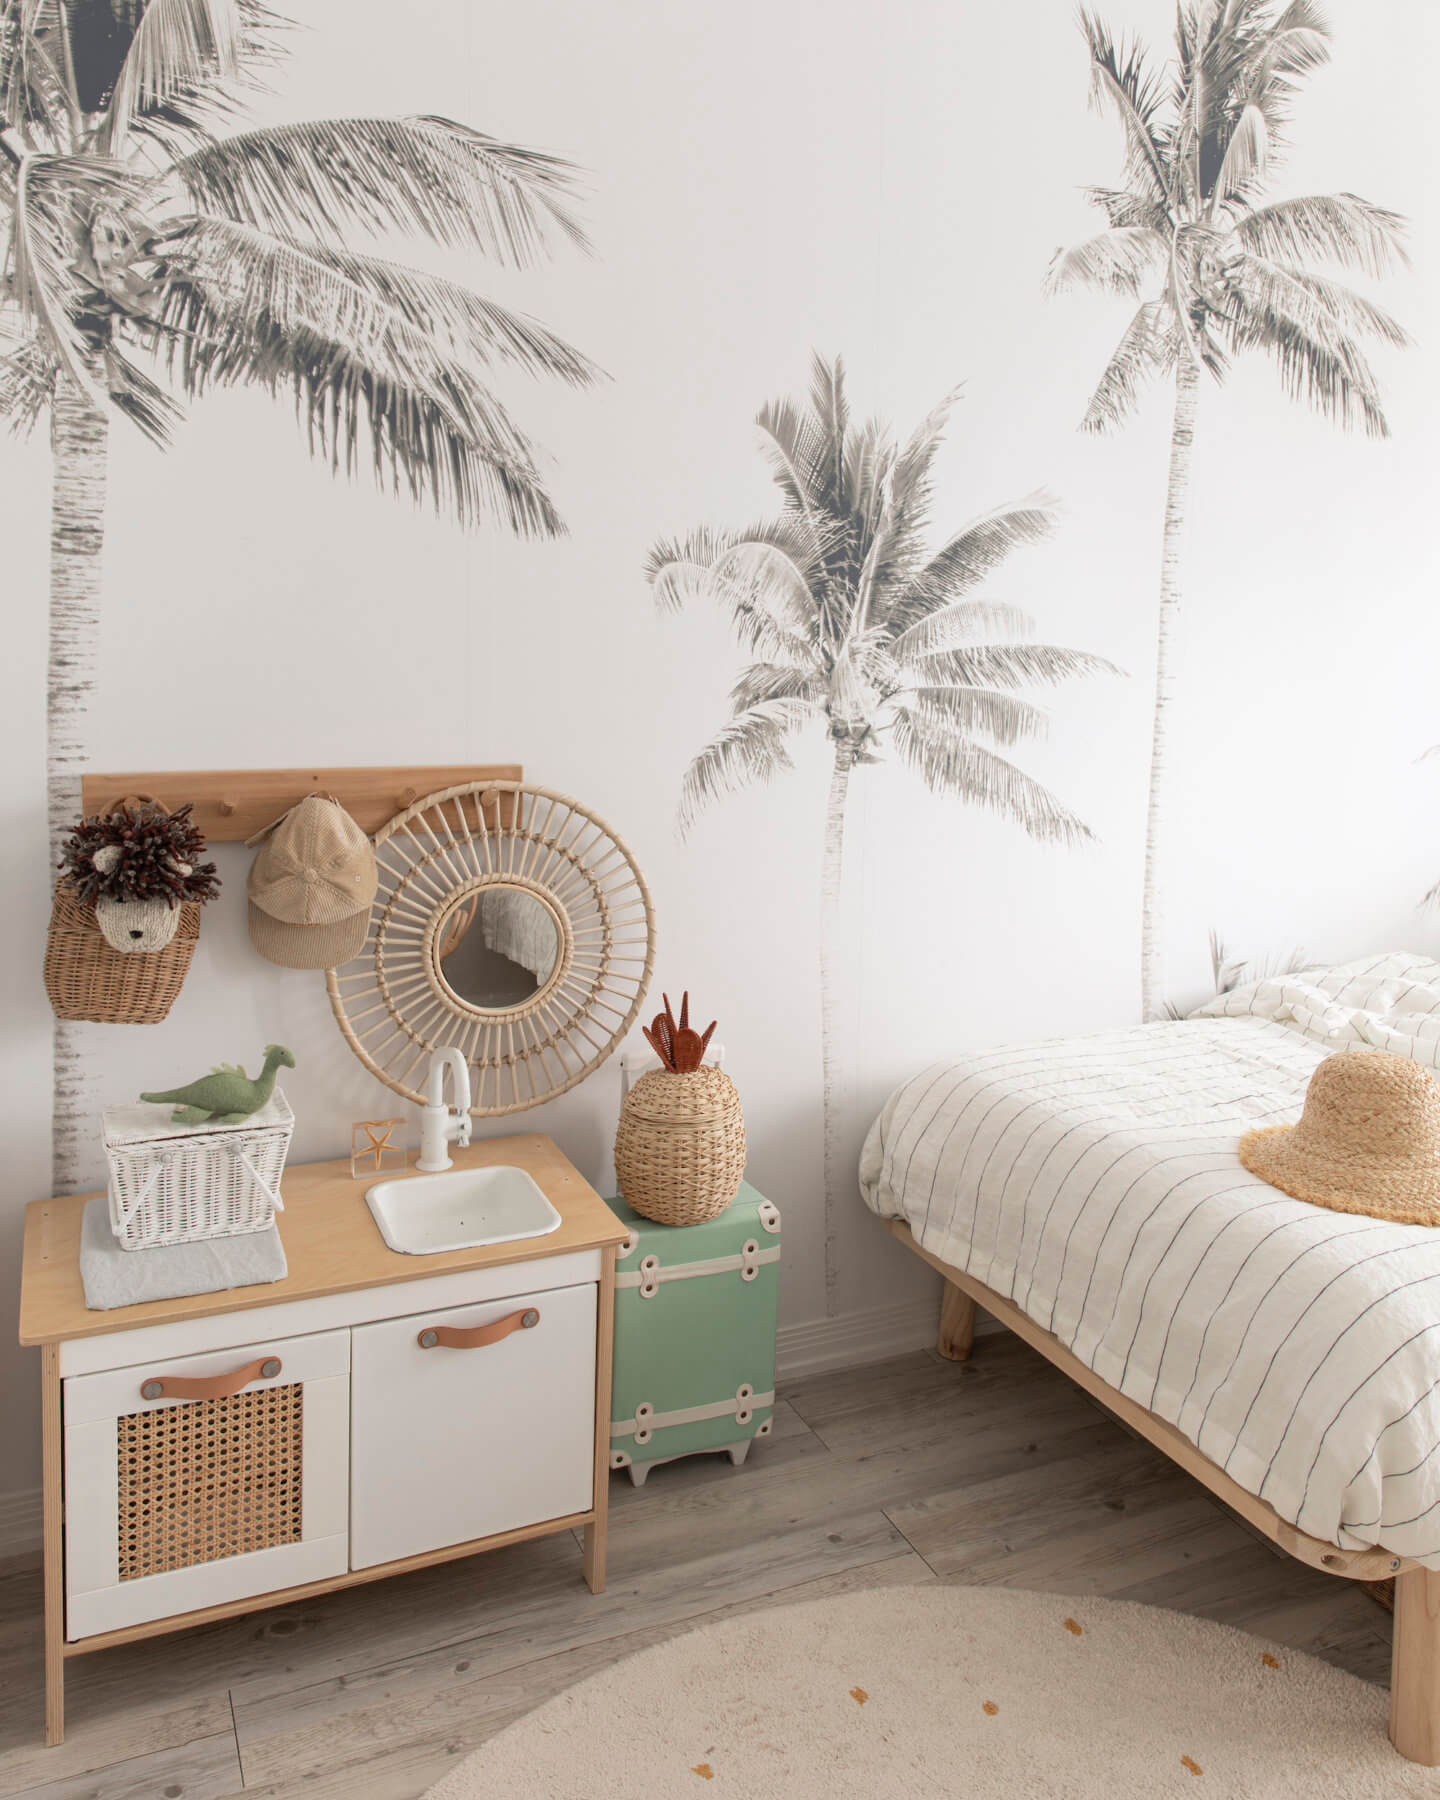
Decorating a child’s room is an exciting endeavor, and the coastal theme brings a breath of fresh air. Coastal kids’ decor combines the charm of the seaside with playful elements, creating a vibrant and soothing environment for your little ones.
Embracing the Coastal Aesthetic
Coastal decor for kids’ rooms draws inspiration from the beach, incorporating soothing colors, natural textures, and nautical elements. The palette often includes soft blues, sandy neutrals, and hints of coral, creating a serene atmosphere reminiscent of a day at the seaside.
Ocean-Inspired Wall Murals
Set the stage for coastal magic with ocean-inspired wall murals. From whimsical underwater scenes to adorable sea creatures, these murals transport children into a world of imagination. Consider adding a mural featuring dolphins, turtles, and colorful fish to spark creativity and a love for marine life.
Nautical Furniture for Playful Comfort
Choose furniture that complements the coastal theme while providing comfort and functionality. Nautical-themed beds, dressers shaped like boats, or bedside tables resembling treasure chests add a playful touch. These pieces not only serve a practical purpose but also contribute to the overall charm of the coastal kids’ decor.
Sail into Dreamland with Bedding Choices
Transform bedtime into a seaside adventure with coastal-inspired bedding. Opt for sheets adorned with seashells, starfish, or sailboats. Quilts or comforters featuring maritime motifs can instantly evoke a sense of coastal bliss, making bedtime an enjoyable and calming experience for your little ones.
Seashell and Driftwood Accents
Incorporate natural elements such as seashells and driftwood to bring the coastal ambiance indoors. Display seashell collections on shelves or use them to create DIY art projects. Driftwood can be repurposed into unique decor items, adding an authentic touch to the room.
Whimsical Lighting Fixtures
Lighting plays a crucial role in setting the mood of any space. Choose whimsical lighting fixtures that align with the coastal theme. Pendant lights shaped like seashells or fish, or bedside lamps resembling lighthouses, infuse a sense of wonder and playfulness into the room.
Interactive Wall Decals for Creativity
Encourage your child’s creativity with interactive wall decals. Map decals that allow them to mark their favorite coastal spots or chalkboard decals for drawing seaside adventures add an interactive and personal touch to the room. These decals are easy to apply and can be changed as your child’s interests evolve.
Storage Solutions with Coastal Flair
Keep the room organized with storage solutions that seamlessly blend with the coastal decor. Woven baskets resembling beach totes or storage bins adorned with anchor motifs offer practicality with a touch of seaside charm. Teach your child the importance of keeping their space tidy in a fun and stylish way.
Coastal Kids’ Decor: Where Imagination Sets Sail
Explore the enchanting world of Coastal Kids’ Decor to bring the beauty of the seaside into your child’s room. Our curated collection includes everything from bedding to furniture, ensuring that every piece reflects the charm of coastal living. Let your child’s imagination set sail with decor that combines
Plumbing Advice That Everyone Should Know About

How much knowledge of plumbing? What plumbing skills do you have? If you can’t answer these questions, it’s time to give this article a read.
To eliminate the possibility of having frozen pipes, insulate all exterior pipes and be sure to keep your interior house temperature above freezing, and insulate external pipes. Your pipes can freeze if temperatures around it is below 32 degrees. It may take some time to thaw so that you can have running water. However, your pipes can explode, and that could make a mess and result in a big repair bill.
If you discover a pipe has frozen, make sure you turn the closest faucet to allow the thawing water to exit. This can prevent damage to your house because it lets the pressure that is in the pipe out, which could prevent a big mess in your home.
Knowing your tools are what and the proper way to use them will make you much better at plumbing. Before undertaking repairs on your own, you should have a plan; otherwise, or you may make a costly mistake.
Don’t use harsh chemicals such as toilet tablets that claim to be cleaners in your toilet. These products may well remove odors, but they can seriously damage the rubber pieces in the toilet, which can prevent your toilet from functioning correctly.
Pour equal parts baking soda followed by vinegar down your bathtub drain every month. Plug the opening or cover it with a cloth while the chemical reaction to occur. Wait a while, then flush the pipes by pouring in a kettle full of boiling water. This should open up the pipes of hair build-up and soap scum.
Shower Heads
Installing efficient shower heads can save you a lot of money on your energy bill. Most of the hot water in our showers. By installing energy-efficient shower heads for a few extra dollars, you can save over a hundred bucks or more per every shower head in the home.
If the hose that leads to your kitchen sink has not been maintained or installed properly, check the connection on your kitchen sink. The hose from your sink and the dishwasher has to go upward before going back down so that there is no mixing between fixtures.
Do you feel more in-the-know about plumbing after reading these tips? Do you now have a better grasp of what kind of system is in your home? Have your plumbing skills increased? Do you know how to choose things that will work with your home’s system? Are you aware of exactly how to correctly operate the equipment? With any luck, the tips above should have created better answers.…
Parquet Floor Care: Essential Tips for Lasting Beauty
/ways-to-make-hardwood-floors-shine-1901094_hero_0143-cb7a9189a3ec464d9c1f9a9b304e4d70.jpg )
/ways-to-make-hardwood-floors-shine-1901094_hero_0143-cb7a9189a3ec464d9c1f9a9b304e4d70.jpg)
Unlocking the Timeless Beauty: A Guide to Parquet Floor Care
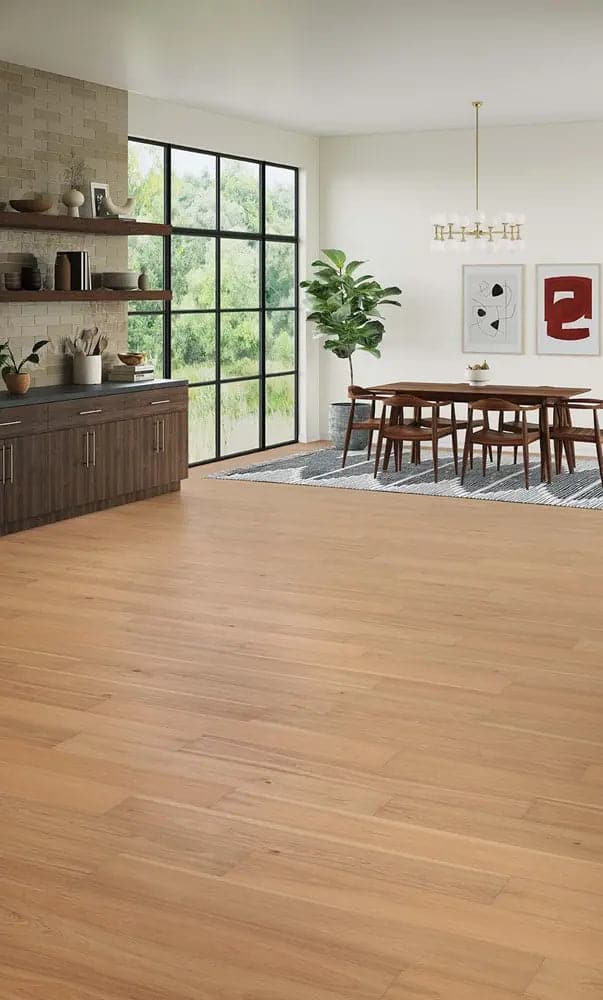
Maintaining the allure of parquet flooring requires a combination of proper care and attention to detail. As a timeless choice for homeowners, parquet floors can add elegance and warmth to any space. Let’s delve into essential tips and tricks to ensure your parquet floors retain their beauty for years to come.
Understanding the Essence: What is Parquet Flooring?
Parquet flooring is a unique and sophisticated choice characterized by intricate geometric patterns formed by small wood pieces. This type of flooring offers a timeless aesthetic, making it a popular option for those who appreciate classic design. Understanding the essence of parquet helps in grasping the specific care it demands.
Daily Maintenance Routine: A Gentle Touch
The key to preserving parquet floors lies in a gentle and consistent cleaning routine. Begin by removing loose dirt and debris with a soft broom or a vacuum cleaner with a hardwood floor attachment. Avoid using abrasive brushes, as they can scratch the delicate surface of the parquet. A soft touch in your daily maintenance goes a long way in preserving its natural beauty.
Mopping Mastery: Choosing the Right Cleaning Solutions
When it comes to mopping, selecting the right cleaning solution is crucial. Opt for a pH-neutral, parquet-friendly cleaner to avoid damage to the wood. Dampen a soft microfiber mop with the solution, ensuring it is not overly wet. Excess water can seep into the seams of the parquet, causing swelling and potential long-term damage.
Dealing with Spills: Swift Action is Key
Accidents happen, and spills are inevitable. The key is to address them promptly. Wipe away spills immediately with a soft, dry cloth to prevent the liquid from penetrating the wood. For tougher stains, use a slightly dampened cloth with a designated wood cleaner. Avoid harsh chemicals, as they can strip away the protective finish of the parquet.
Sunlight and Furniture: Shielding from Potential Harm
Protecting parquet floors extends beyond cleaning. Shield your floors from prolonged exposure to direct sunlight, as it can cause fading and discoloration. Consider using curtains or blinds to regulate sunlight. When arranging furniture, use protective pads underneath legs to prevent scratches and dents, ensuring your parquet remains pristine.
Periodic Deep Cleaning: Reviving the Shine
In addition to daily maintenance, periodic deep cleaning is essential to revive the shine of parquet floors. Use a specialized wood floor cleaner and follow the manufacturer’s instructions. This deep-cleaning process removes ingrained dirt and grime, restoring the luster of your parquet.
Humidity Control: Maintaining Balance
Wood is sensitive to changes in humidity, and parquet floors are no exception. Maintain a stable indoor humidity level to prevent the wood from expanding or contracting. Consider using a humidifier or dehumidifier, especially in regions with extreme climate variations, to ensure the longevity of your parquet flooring.
Protective Measures: Area Rugs and Mats
Strategic placement of area rugs and mats in high-traffic areas can significantly contribute to the preservation of parquet floors. These protective measures prevent excessive wear and
Renew and Shine: Laminate Floor Restoration

Revitalize Your Space: Laminate Floor Restoration
Laminate flooring is a popular choice for its durability and easy maintenance. Over time, however, wear and tear can take a toll on its appearance. Fear not! Laminate floor restoration is a cost-effective way to breathe new life into your floors, bringing back their original luster. Let’s dive into the process and discover how you can renew and shine.
Assessing the Condition: A Step-by-Step Evaluation
Before embarking on the restoration journey, assess the current condition of your laminate floors. Identify areas with scratches, dullness, or discoloration. Understanding the extent of the damage will help you determine the appropriate restoration techniques needed for each specific issue.
Thorough Cleaning: A Fresh Start for Your Floors
The first step in laminate floor restoration is a thorough cleaning. Remove dust, dirt, and debris using a vacuum or a soft broom. Follow up with a damp mop using a gentle laminate floor cleaner. This initial cleaning not only enhances the appearance but also prepares the surface for more targeted restoration efforts.
Scratch Repair: Addressing Surface Imperfections
Scratches are common on laminate floors, especially in high-traffic areas. Fortunately, there are various methods to repair surface scratches. Use a laminate floor repair kit, which typically includes putty or markers that match the floor color. Apply the product to the scratches, following the kit instructions, and watch as the imperfections fade away.
Dealing with Dullness: Restoring the Shine
Over time, laminate floors may lose their shine due to everyday wear. To restore the glossy finish, consider using a laminate floor polish. Apply the polish evenly across the floor, following the product guidelines. This step not only revitalizes the shine but also adds a protective layer to guard against future damage.
Color Restoration: Bringing Back Vibrancy
If your laminate floors have experienced color fading or discoloration, color restoration is the answer. Choose a quality laminate floor restorer that matches the original color of your floors. Apply the restorer with a soft cloth or applicator, ensuring even coverage. This process rejuvenates the color and leaves your floors looking vibrant once again.
Sealing and Protecting: Guarding Against Future Damage
To prolong the effects of laminate floor restoration, sealing and protecting the surface is crucial. Use a laminate floor sealer to create a protective barrier against stains, scratches, and moisture. Follow the application instructions carefully to ensure a thorough and even coat, providing long-term defense for your revitalized floors.
Laminate Floor Restoration: A Link to Renewed Elegance
Experience the transformative power of Laminate Floor Restoration with our curated selection of restoration products. Our range includes everything you need to revitalize your laminate floors and bring back their original elegance. Explore the collection and embark on a journey to renew and shine.
Conclusion: Unveiling the Beauty of Renewed Floors
In conclusion, laminate floor restoration unveils the beauty of renewed floors, breathing life back into your living spaces. From scratch repair and shine restoration to color rejuvenation and protective sealing, each step contributes to the overall revitalization of
Floor Restoration Tips: Bring Your Surfaces Back to Life

Floor Restoration Tips: Bring Your Surfaces Back to Life
Whether you’ve just moved into a new home or want to revitalize the beauty of your existing space, floor restoration can make a significant difference. Here are some valuable tips to help you bring your surfaces back to life.
Understanding Your Floor Type
Before diving into restoration, it’s crucial to identify the type of flooring you have. Whether it’s hardwood, laminate, tile, or another material, each surface requires specific care. Check manufacturer guidelines or consult with experts to ensure you’re using the right products and techniques.
Deep Cleaning for a Fresh Start
Start the restoration process with a thorough deep cleaning. Remove dirt, grime, and any old finishes that may have dulled the appearance of your floors. Use appropriate cleaning solutions and tools, taking care not to damage the surface. This initial step sets the foundation for the restoration process.
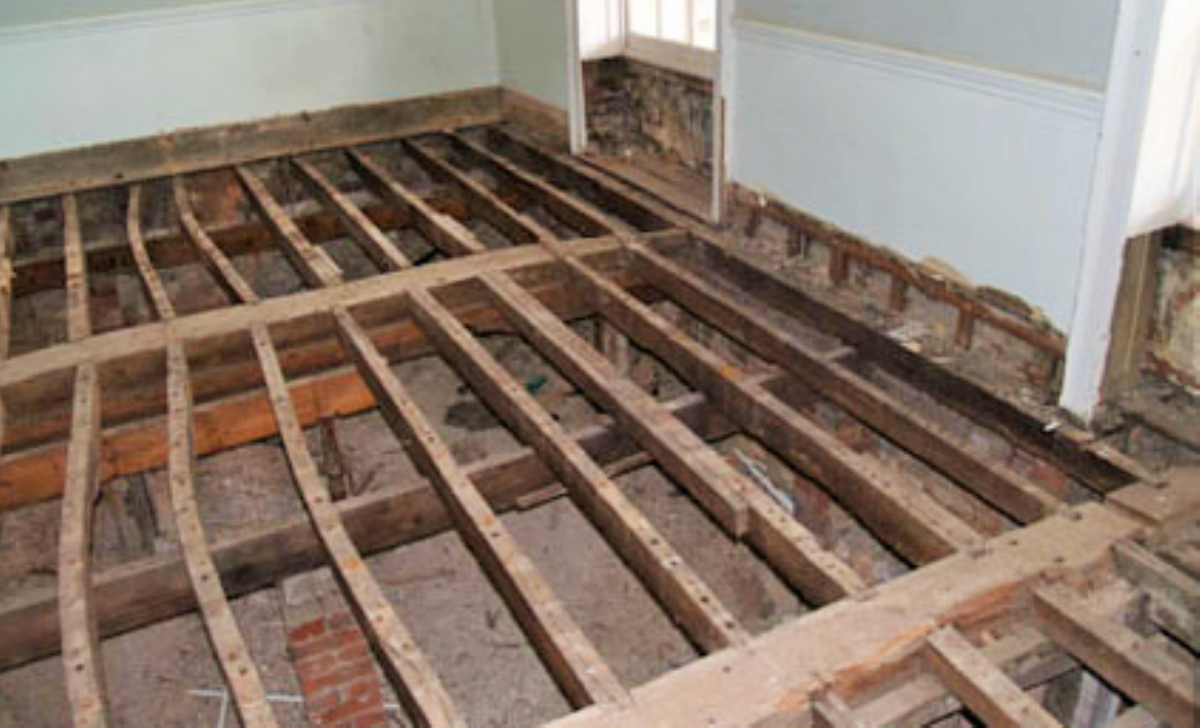
Repairing and Patching
Inspect your floors for any damage, such as scratches, dents, or cracks. Depending on the material, you may need to fill in gaps or replace damaged sections. For wooden floors, consider sanding to remove imperfections and create a smooth surface. Patching up these issues ensures a more even and attractive finish.
Choosing the Right Finish
Selecting the right finish is a critical aspect of floor restoration. The finish not only enhances the aesthetic appeal but also provides protection against future wear and tear. Whether you opt for a glossy finish for a sleek look or a matte finish for a more natural appearance, ensure it complements your overall design and lifestyle.
Applying the Finish with Care
Once you’ve chosen the appropriate finish, apply it with precision. Use long, even strokes to achieve a uniform coating. Pay attention to drying times and ventilate the space adequately. Applying the finish correctly ensures durability and a polished look that lasts.
Routine Maintenance for Longevity
After restoring your floors, implement a routine maintenance plan to preserve their beauty. Regular cleaning, avoiding harsh chemicals, and using furniture pads to prevent scratches contribute to the longevity of your newly restored surfaces. By incorporating these habits, you’ll enjoy the results of your hard work for years to come.
Seeking Professional Assistance
For complex or extensive floor restoration projects, don’t hesitate to seek professional assistance. Flooring experts have the knowledge and tools to tackle challenging issues and ensure a flawless finish. Consulting with professionals can save you time and potentially prevent costly mistakes.
Floor Restoration Tips for Every Homeowner
In conclusion, floor restoration is a rewarding endeavor that can breathe new life into your living space. Understanding your floor type, deep cleaning, repairing and patching, choosing the right finish, applying it carefully, and maintaining your floors are key steps. For more in-depth guidance and a wide range of floor restoration products, visit Floor Restoration Tips. Whether you’re a DIY enthusiast or prefer professional help, these tips will help you achieve stunning results and enjoy the beauty of your floors for years to come.
Preserving Elegance: Terrazzo Floor Sealing Mastery

Preserving Elegance: Mastering Terrazzo Floor Sealing
Terrazzo floors are renowned for their timeless elegance and durability. To maintain and enhance their beauty, proper sealing is crucial. In this article, we’ll explore the art of Terrazzo Floor Sealing, the benefits it offers, and the steps to ensure your terrazzo floors remain a stunning focal point in your space.
Understanding Terrazzo Floors: A Mosaic of Elegance
Terrazzo floors are a captivating mosaic of marble, quartz, granite, glass, and other materials set in a binder. This unique composition creates a durable and visually striking surface. To preserve the elegance of terrazzo, proper care, and maintenance, including sealing, are essential.
The Importance of Terrazzo Floor Sealing: Guarding Against Wear
Terrazzo floor sealing serves as a protective shield against wear and tear. The porous nature of terrazzo makes it susceptible to stains, scratches, and other forms of damage. Sealing acts as a barrier, preventing liquids, dirt, and contaminants from penetrating the surface and compromising its integrity.
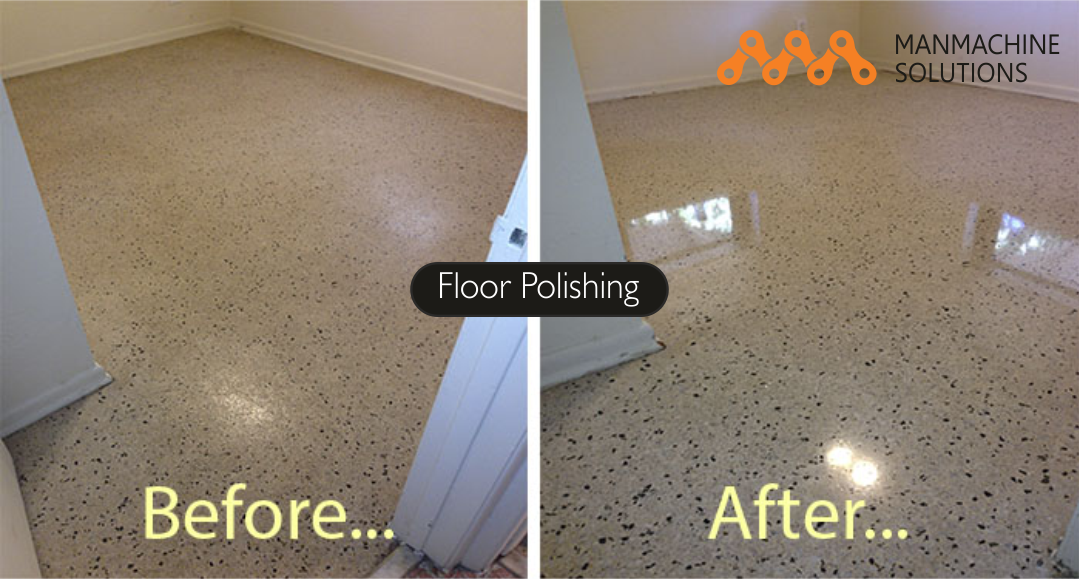
Benefits of Terrazzo Floor Sealing: Longevity and Radiance
The benefits of terrazzo floor sealing extend beyond protection. Sealed terrazzo floors boast increased longevity, resisting damage from heavy foot traffic and daily wear. Additionally, sealing enhances the natural radiance of the terrazzo, bringing out its vibrant colors and patterns, and contributing to a glossy and polished appearance.
Choosing the Right Sealer: Tailoring Protection to Terrazzo
Selecting the right sealer is crucial for effective protection. Terrazzo comes in various compositions, and each may require a specific type of sealer. Penetrating sealers are ideal for denser terrazzo, while topical sealers provide a protective layer for more porous compositions. Consulting with a flooring professional ensures the correct sealer is chosen for your specific terrazzo type.
The Sealing Process: A Step-by-Step Guide
Terrazzo floor sealing involves a systematic process to achieve optimal results. First, thoroughly clean the terrazzo surface to remove any dirt or debris. Once cleaned, apply the chosen sealer evenly, ensuring complete coverage. Allow the sealer to penetrate and cure, following manufacturer guidelines. Finally, polish the surface for a glossy finish that enhances the terrazzo’s inherent beauty.
Frequency of Sealing: Tailoring to Usage
The frequency of terrazzo floor sealing depends on the level of usage and wear. High-traffic areas may require more frequent sealing to maintain optimal protection. Regular assessments of the terrazzo’s condition will guide the timing of resealing, ensuring continuous protection against potential damage.
DIY vs. Professional Sealing: Making the Right Choice
While some homeowners may attempt DIY terrazzo floor sealing, seeking professional expertise is advisable. Professionals possess the knowledge and experience to assess the specific needs of your terrazzo and apply the appropriate sealing technique. This ensures a thorough and effective sealing process, maximizing the longevity and beauty of your terrazzo floors.
Additional Terrazzo Floor Care Tips: Sustaining Elegance
Beyond sealing, proper care is essential to sustain the elegance of terrazzo floors. Regular sweeping and gentle cleaning with a pH-neutral cleaner help prevent dirt buildup. Avoid abrasive cleaning agents and excessive water, as these can compromise the sealer and
Warm Elegance: Heated Tile Floors for Cozy Living


Elevate Comfort: Embracing the Warmth of Heated Tile Floors
In the realm of modern home design, heated tile floors stand out as both a luxurious and practical choice. Beyond the opulent feel, these floors provide a comfortable and cozy living environment, making them a popular option for homeowners seeking an upgrade in both style and functionality.
Efficient and Even Heating Distribution
One of the key advantages of heated tile floors is their ability to provide efficient and even heating distribution throughout a room. The heating elements, installed beneath the tile surface, radiate warmth evenly, eliminating cold spots and ensuring a consistently cozy atmosphere. This feature is especially appreciated during chilly seasons.
Luxury Meets Practicality in Bathroom Bliss
In bathrooms, where cold tile can be particularly unwelcome, heated floors offer a touch of luxury and practicality. Stepping onto a warm tile floor on a cold morning is a delightful experience. The heating elements beneath the tiles can be programmed to warm up before your usual morning routine, creating a spa-like ambiance right in your own home.
Energy Efficiency with Zone Heating
Heated tile floors contribute to energy efficiency by allowing for zone heating. Rather than heating the entire house, you can focus on warming specific zones, such as the bedroom or living room, where you spend the most time. This targeted approach not only enhances comfort but also helps reduce energy consumption and lower heating bills.
Versatility in Design and Style
Beyond the functional benefits, heated tile floors offer versatility in design and style. With a wide array of tile options available, homeowners can choose tiles that complement their interior decor. Whether you prefer the classic look of ceramic, the natural beauty of stone, or the sleekness of porcelain, heated floors seamlessly integrate into various design schemes.
Easy Integration into Renovation Projects
For those considering home renovations, heated tile floors are a practical addition. These systems can be seamlessly integrated into both new construction and existing spaces. Retrofitting existing floors with radiant heating technology is a feasible option, providing homeowners with the opportunity to enjoy the benefits of heated floors without a complete overhaul.
Installation and Maintenance Simplified
The installation process for heated tile floors has become increasingly streamlined, thanks to advancements in technology. While it’s recommended to enlist professional help, modern systems often involve minimal disruption during installation. Additionally, the maintenance requirements are generally low, making heated tile floors an attractive option for those seeking both luxury and convenience.
Heated Tile Floors: A Link to Year-Round Comfort
To experience the warmth and luxury of Heated Tile Floors, explore our collection of state-of-the-art heating solutions. Our range encompasses various styles and technologies, ensuring that your home is not only comfortable but also exudes a touch of sophistication. Discover the joy of walking on warm tiles, transforming your living spaces into havens of coziness.
Conclusion: Unveiling the Elegance of Radiant Comfort
In conclusion, heated tile floors unveil the elegance of radiant comfort, providing homeowners with a luxurious yet practical solution. The
Suspended Bliss: Creative Bedroom Hammock Ideas


Suspended Bliss: Exploring Creative Bedroom Hammock Ideas
Creating a dreamy and unconventional bedroom involves thinking beyond traditional furniture. Bedroom hammocks offer a unique and cozy alternative to beds and chairs. In this article, we’ll explore creative Bedroom Hammock Ideas that elevate your space, providing a perfect blend of comfort and style.
1. Indoor Oasis: Transforming Your Bedroom Escape
Hammocks bring a touch of the outdoors indoors, creating a tranquil oasis within your bedroom. Suspend a hammock near a window, allowing natural light to filter through, creating a serene spot for relaxation and daydreaming. This simple addition can transform your bedroom into a calming retreat.
2. Bohemian Chic: Embracing a Relaxed Aesthetic
For a bohemian-inspired bedroom, incorporate a hammock with vibrant and patterned fabrics. Hang it close to a corner with plush floor cushions and textured rugs. This laid-back approach adds a touch of bohemian chic, creating a space that feels effortlessly relaxed and cozy.
3. Double Delight: Sharing the Hammock Love
Consider a double hammock for a romantic and shared bedroom experience. Suspend a larger hammock between sturdy points in the room, creating a cozy nook for two. This not only adds a romantic touch but also provides a unique and intimate space for bonding with your partner.
4. Hammock Chair: Compact Comfort
If space is limited, opt for a hammock chair. These compact and stylish alternatives offer a comfortable seating solution without the need for extensive hanging space. Install a hammock chair in a corner or by a window, creating a cozy reading or lounging spot within a confined space.
5. Coastal Retreat: Nautical Elements for a Seaside Feel
Infuse a coastal vibe into your bedroom with a hammock that incorporates nautical elements. Opt for a hammock in shades of blue and white, and pair it with natural materials like rope or driftwood. This coastal retreat idea adds a sense of seaside charm and relaxation to your sleeping space.
6. Floating Bed Bliss: A Unique Sleeping Experience
For a truly innovative bedroom concept, consider a floating bed hammock. Suspend a bed-style hammock from the ceiling, creating a floating sensation. Enhance the experience with soft bedding, plush pillows, and canopy drapes. This unconventional approach turns your sleeping space into a captivating cocoon.
7. Hammock Lounge: Elevated Lounging Experience
Transform a corner of your bedroom into a hammock lounge. Hang multiple hammocks at varying heights to create a layered and visually appealing lounging area. This concept encourages relaxation and offers a dynamic and playful aesthetic to your bedroom space.
8. Hammock with Canopy: Stylish Sun Protection
Extend the functionality of your bedroom hammock by adding a canopy. This not only provides a stylish touch but also offers sun protection if your hammock is near a window. Choose a canopy in a complementary color to enhance the overall design of your bedroom.
9. Hanging Hammock Bed: The Ultimate in Comfort
Take hammock lounging to the next level with a hanging hammock bed. Suspend a large, comfortable hammock bed from the ceiling, creating